Are your bike brakes not functioning as well as they used to?
One of the most common reasons this happens is that you need to replace bike brake cables. Due to biking very often, your bike brake line will wear out and won’t function properly. Even if you don’t bike regularly, bike brake cables are not invincible, and they are bound to weaken over time.
Before we begin giving you instructions on how to replace your bike brake cable, let’s define what a brake cable is.
What is a Brake Cable?
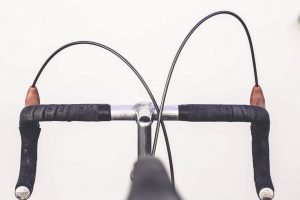
A brake cable is one of the three parts of your braking system. A braking system is made of:
- the brake cables,
- the braking pads, and
- the handlebar levers.
The brake cable is the link between the handlebar levers and the braking pads. Once you pull the levers, it will pull the cables and activate the braking pads, which will eventually slow down your bike depending on how much you squeeze the levers.
Preparation for Replacing a Bike Brake Cable
Like in every other important project, we must first prepare beforehand to ensure a most successful process. There are two essential factors to keep in mind before starting to replace bike brake cables.
Check the type of brake on your bike
First and foremost, you should always check and research the type of brake on your bike. There are different types of brakes, and although most of them have cables, not all are connected to the same part of your bike.
So make sure to check which brakes your bike has before replacing the brake cables.
Assemble the tools
Another equally important aspect of preparation is assembling the tools needed for the process. Changing your bike’s brake lines might not take too long, but you don’t want any distractions; or running off to get the tools you need.
So assemble your tools, and get ready to focus and succeed.
How to Replace Bike Brake Cable in 5 easy steps

As you already read from the title of this article, yes, it takes only five steps to replace a bike’s brake cable, that is, of course, if you follow the instructions carefully.
Remove the old brake cable
The first step to replacing your bike brake cable is to remove the old one. To do this, first, you need to deal with the tire end of the cable. The cable you want to remove is made of steel twisted together, wrapped up in its housing, and also made from a type of flexible steel.
You want to remove the inner steel cable only (if the housing is not damaged as well). If the steel strands are damaged, just take a pair of pliers and cut them to move freely through the housing. Then, take your allen key and twist the bolt counterclockwise until it’s loose.
Remove the handlebar end of the cable
After you’ve successfully loosened the tire-end cable part, it is time to move on to the handlebar end of the cable.
For this part, you won’t need any tools other than your steel-strong hands. You’re going to see a small metal barrel attached to the handlebar levers, which is used to connect the cable to it. Just twist it with your fingers until it’s loose until you can remove it freely.
To remove it, pull the lever, which will open a slot for you to remove the cable from the handlebars easily. You should then be able to remove the cable from the housing from both ends with no difficulties.
Install the new brake cable
You’ve successfully removed the old brake cable, out with the old and in with the new.
Installing the new cable is the same procedure as removing it except in reverse. However, make sure that the new cable matches your old housing (if you’re not replacing it as well). A perfect match will be one where the housing won’t have much space to bend with the new cable. You should find it pretty easy to install the new brake cable in the housing as all you have to do is slide it in carefully and cut the housing on one end if it’s too big for the new cable.
Finalize brake cable installation
Coming to the finish line, you’re almost done with the installation. All you have to do is attach and position the new cable to proceed with the next instructions we have.
Connect the cable to the brake
When you’re attaching the cable to the tire end, make sure to screw in the bolt tight, and the same goes for the handlebar end of the cable; squeeze the lever until the slot opens and carefully place it back in.
Position and adjust the brake cable
Carefully place the cable in both the tire end and the handlebar end. If it’s a little loose, you can use simple zip ties to attach it to the bike frame.
Test before ride
Last but not least, test before you ride. Go forward and backward while squeezing the levers and seeing if it’s working correctly. If the pulling of the levers feels too tight, you can always loosen up the bolts a bit, and if it’s loose, just tighten them using the allen key for the tire end and your fingers for the handlebar end.
How Often Should I Replace My Bike Brake Cable?
Replacing the bike brake cable should usually be done when the braking feels very fragile, and the cable is visibly damaged along with its housing. However, if you are looking for a more specific timeline, we advise you to replace the brake cable once a year if you cycle very often and once every two years if you cycle every once in a while and maintain your bike well.
The Bottom Line
After you complete this task, you’ll be very grateful you didn’t cave in and go to a bike shop to have someone else do a job you can easily do yourself. Make sure to follow the instructions we’ve laid out for you and believe you are your bike’s master because we believe you are!


